 Austria - EUR
 Belgium - EUR
 Bulgaria - EUR
 Cyprus - EUR
 Czech Republic - EUR
 Estonia - EUR
 Greece - EUR
 Hungary - EUR
 UK - GBP
 Ireland - EUR
 Latvia - EUR
 Lithuania - EUR
 Luxembourg - EUR
 Malta - EUR
 Netherlands - EUR
 Norway - NOK
 Portugal - EUR
 Romania - EUR
 Slovakia - EUR
 Slovenia - EUR
 Switzerland - EUR
How to change the rear wheel on the Husqvarna Automower 105/305/308
Here is our step by step guide on how to change the rear wheel on the Husqvarna Automower 105/305/308 and also the Gardena R40/R45/R50li models
The rear wheel only rotates forwards and backwards as it has no pivoting axle. When the robot makes lateral movements, the wheels slide and as a result wear out over time. You can buy the rear wheel either as a set with bearings and seals or separately. In this guide, we will show you how to transfer the old ball bearings and seals to a new rear wheel.
Changing the rear wheel is a simple process and doesn't require any special tools. See below for step by step instructions.
At the bottom of the page there is a list of the spare parts needed for the job.
.jpg) Step 1: Turn your Automower over. Unscrew the four screws on the rear wheel. Step 1: Turn your Automower over. Unscrew the four screws on the rear wheel. | .jpg) Step 2: Turn your Automower over. Unscrew the four screws on the rear wheel. Step 2: Turn your Automower over. Unscrew the four screws on the rear wheel. |
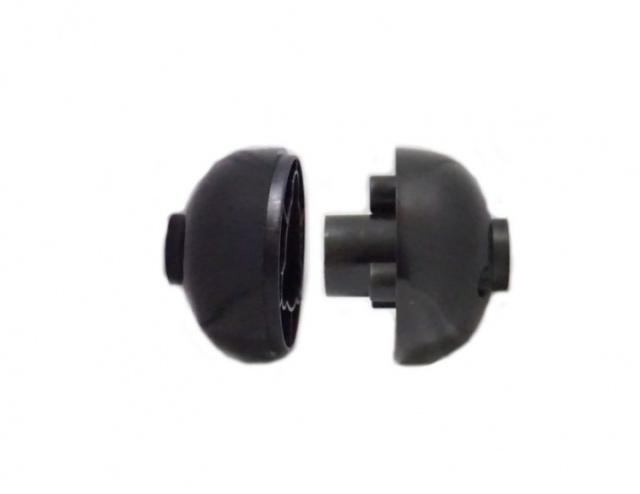
.jpg) Step 3: Remove the holders from the rear wheel by pulling them outwards. Unscrew the three screws according to the markings. | .jpg) Step 4: Pull the rear wheel apart. |
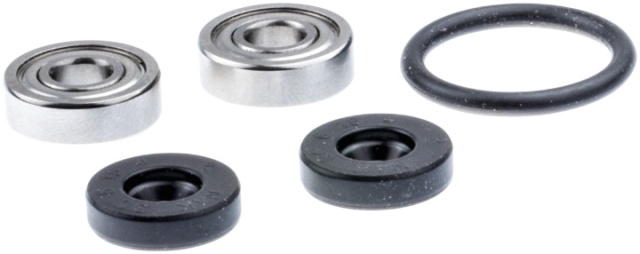
.jpg) Step 5: Remove the axle with ball bearing and the three gaskets from the old rear wheel. | Step 6: Install the axle and the three gaskets in the new rear wheel. |
.jpg) Step 7: Press the rear wheel together. Then screw the three screws on again and put the ends back on the shaft. | Step 8: Now reassemble the rear wheel in its bracket using the four screws. |
How to change the rear wheel on the Husqvarna Automower 105/305/308
Here is our step by step guide on how to change the rear wheel on the Husqvarna Automower 105/305/308 and also the Gardena R40/R45/R50li models
The rear wheel only rotates forwards and backwards as it has no pivoting axle. When the robot makes lateral movements, the wheels slide and as a result wear out over time. You can buy the rear wheel either as a set with bearings and seals or separately. In this guide, we will show you how to transfer the old ball bearings and seals to a new rear wheel.
Changing the rear wheel is a simple process and doesn't require any special tools. See below for step by step instructions.
At the bottom of the page there is a list of the spare parts needed for the job.
Tools used: Torx screwdriver T25.
| Step 1: Turn your Automower over. Unscrew the four screws on the rear wheel. |
| Step 2: Remove the rear wheel from the robot. |
Step 3: Remove the holders from the rear wheel by pulling them outwards. Unscrew the three screws according to the markings. |
Step 4: Pull the rear wheel apart. |
Step 5: Remove the axle with ball bearing and the three gaskets from the old rear wheel. |
Step 6: Install the axle and the three gaskets in the new rear wheel. |
Step 7: Press the rear wheel together. Then screw the three screws on again and put the ends back on the shaft. |
Step 8: Press the rear wheel together. Then screw the three screws on again and put the ends back on the shaft. |
Spare parts used
Alternative spare part

 Help center is a digital DIY manual for Husqvarna Automower robotic lawnmower. We teach you how to change batteries, circuitboards and other spare parts on your Husqvarna Automower.